Introduction to Laying Paving Slabs
Transforming your garden into a beautiful outdoor space can be a rewarding project, and one of the best ways to achieve this is through flagging. Laying paving slabs not only enhances your garden’s aesthetic appeal but also provides a practical surface for outdoor activities. Whether you’re looking to create a charming pathway, an inviting patio area, or simply want to improve accessibility in your garden, mastering the art of laying paving slabs is essential.
This simple guide will walk you through everything you need to know about flagging a garden—from planning and preparation to installation and maintenance. With the right tools and techniques at your fingertips, you’ll be well on your way to creating a stunning paved oasis that reflects your personal style. Ready to get started? Let’s dive in!
Planning and Preparation: Tools and Materials Needed
Before diving into flagging a garden, gather your tools and materials. This ensures a smooth process.
Start with the basics: a shovel for digging, a trowel for smoothing edges, and a rubber mallet to set those paving slabs firmly in place. A level is crucial too; you want everything straight and even.
For materials, choose high-quality paving slabs suited to your style. Whether concrete or natural stone, each has its charm. Don’t forget sand or gravel for the base layer—this provides stability.
A measuring tape will help keep dimensions accurate while marking out your layout. Consider safety gear like gloves and knee pads to protect yourself during installation.
With everything on hand, you’re ready to create an inviting paved space that enhances your garden’s appeal.
Step-by-Step Guide to Laying Paving Slabs
Start by marking the area where you want to lay your paving slabs. Use stakes and string to outline the shape clearly.
Next, remove any grass or debris from the marked space. Dig down about 150mm to create a solid base for your slabs. This depth helps with drainage and provides stability.
Once you’ve cleared the area, compact the soil using a plate compactor. Lay a layer of crushed stone or sand as a sub-base, ensuring it’s level throughout.
Now it’s time for your paving slabs. Begin at one corner and place them in position, leaving gaps between each slab for grout or jointing material later on.
Check that each slab is level before moving on to avoid future issues. Adjust them as needed by tapping gently with a rubber mallet until they sit flush with one another.
Tips for a Successful Installation
To ensure a smooth installation, start by checking the weather. Avoid laying paving slabs in rain or extreme heat; both can affect the materials.
Next, focus on your base layer. A solid foundation is crucial for stability. Use compacted hardcore and sand to create an even surface before placing any slabs.
Take your time with spacing. Use spacers to maintain consistent gaps between each slab for a professional look and proper drainage.
Always work from one corner of your project area outwards. This technique prevents you from stepping on freshly laid slabs and disrupting alignment.
Don’t forget about leveling as you go along. Use a spirit level frequently to make adjustments when necessary—this small step saves future headaches.
Consider using a jointing compound that suits your design style while providing durability against shifting or cracking over time.
Maintenance and Troubleshooting
Maintaining your paved garden is essential for longevity. Regularly sweep away debris and dirt to prevent staining and moss growth. A clean surface not only looks better but also enhances safety.
If you notice uneven slabs, it might be time for some adjustments. Lifting the affected slab carefully can help you assess the underlying base. Repack with fresh sand or gravel before resetting.
Weeds are a common nuisance in any garden space. Applying a weed suppressant between joints can reduce their chances of taking root.
For deeper stains, consider using diluted cleaning solutions that won’t harm the stone’s finish. Always test a small area first to ensure compatibility.
Cracks may appear over time due to shifting ground or weather changes. Fill minor cracks with appropriate filler or repair compound designed for paving materials to maintain aesthetics and function effectively.
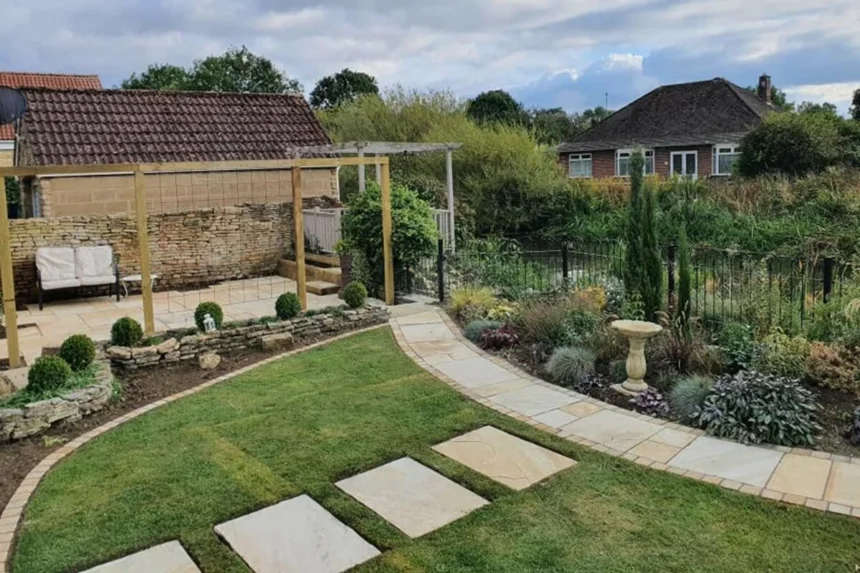
Creative Design Ideas for Paved Gardens
Paved gardens offer endless opportunities for creativity. Consider incorporating geometric patterns with your paving slabs. A herringbone or circular design can add visual interest and sophistication.
Mixing materials can elevate your space, too. Combine natural stone with concrete or brick to create a striking contrast that enhances the overall aesthetic.
Plant pockets are another fantastic idea. Leave small gaps between slabs to plant low-growing flowers or succulents, adding color and life without compromising the functional aspect of your patio.
Pathways lined with decorative gravel guide visitors through lush greenery while maintaining a clean look. You might also think about integrating built-in seating areas using larger stones as benches.
Don’t forget lighting! Inset lights along edges or within the slab itself can create an enchanting atmosphere during evening gatherings.
Conclusion
Flagging a garden can transform your outdoor space into an inviting retreat. Through careful planning and execution, anyone can achieve a professional-looking paved area. Following the step-by-step guide ensures that you lay paving slabs effectively while incorporating creative designs adds a personal touch to your garden.
Remember that maintenance is key to keeping your newly flagged area looking pristine. Regular cleaning and occasional repairs will ensure longevity. With the right tools, materials, and some patience, you’ll create an attractive pathway or patio that enhances your home’s beauty for years to come.
So roll up those sleeves and get ready to flag your garden! The satisfaction of laying those slabs yourself is unmatched, making every effort worthwhile as you enjoy the fruits of your labor in a beautifully designed outdoor space.