There’s nothing quite like the rush of capturing a perfect action shot—a surfer carving through a wave, a mountain biker launching off a ridge, or a skydiver free-falling against an endless sky. Action photography pushes both the photographer and their equipment to the limit, demanding split-second timing, rock-solid stability, and creative angles that put viewers right in the middle of the experience. Yet for every breathtaking image, there are dozens of missed opportunities caused by shaky footage, dead batteries, or simply not having the right tool mounted in the right place.
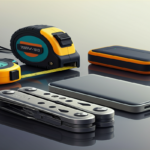
If you own a GoPro, you already have a powerful compact camera in your hands. But the real magic happens when you pair it with the right accessories. The challenge? The market is flooded with hundreds of mounts, cases, clips, and gadgets—each promising to revolutionize your shots. Sorting through them without a clear strategy leads to wasted money and gear bags full of unused equipment. This guide cuts through the noise with clear, actionable steps to help you choose accessories that genuinely elevate your photography, match your shooting style, and deliver the stunning results you’re after.
Why the Right GoPro Accessories Matter for Action Photography
A GoPro straight out of the box is impressive, but it’s only scratching the surface of what’s possible. Think of the camera itself as a foundation—accessories are what turn that foundation into a complete creative toolkit. Without a stabilizer, your mountain biking footage comes out as a jittery mess that’s impossible to pull clean stills from. Without the right mount, you’re stuck shooting from your hand when the best angle is strapped to your chest or clipped to the edge of a kayak. Accessories don’t just add convenience; they fundamentally expand what your camera can do.
Stability is perhaps the most immediate upgrade. A gimbal or well-designed mount eliminates the micro-vibrations that rob action shots of their sharpness, letting you freeze fast-moving subjects with clarity. Beyond that, accessories open up angles that would otherwise be physically impossible—imagine capturing a rock climber’s perspective from the helmet looking down, or a ground-level trail shot as a dirt bike roars past inches away. These perspectives create the immersive, dramatic images that separate amateur snapshots from professional-grade content. For photographers who thrive in dynamic, unpredictable environments, the right accessory isn’t a luxury. It’s the difference between coming home with a memory card full of throwaway frames and returning with images that stop people mid-scroll.
Essential GoPro Accessories for Every Photographer’s Kit
Building a well-rounded accessory collection doesn’t mean buying everything on the shelf. It means investing in the right categories of gear that directly support how and where you shoot. Whether you’re documenting backcountry skiing, underwater reef explorations, or fast-paced street photography, certain accessory types form the backbone of any serious GoPro photographer’s kit. Understanding these categories helps you prioritize purchases and avoid redundant gear that clutters your bag without improving your results.
Mounts and Stabilization Gear
Mounts are the single most transformative category of GoPro accessories because they dictate where your camera sits—and therefore what it sees. A chest mount keeps the camera at torso level, perfect for cycling or skiing where you want to show arm movement and a forward perspective simultaneously. Helmet mounts deliver true point-of-view footage ideal for climbing, motorcycling, or any activity where your head naturally tracks the action. For smoother results, pairing your mount with a handheld gimbal eliminates the jarring vibrations that ruin otherwise great compositions. Gimbals use motorized stabilization to keep your horizon level and your subject centered, even during aggressive movement. If you’re pulling still frames from video, this stability is non-negotiable—it’s the difference between a crisp, usable image and a blurred reject.
Power and Storage Solutions
Nothing kills a productive shoot faster than a dead battery or a full memory card at the worst possible moment. GoPro cameras are compact, which means their batteries are compact too, and heavy use—especially at high resolutions—drains them quickly. Carrying two or three spare batteries along with a portable dual charger ensures you can swap power sources without pausing your session. Equally important is storage: high-capacity, high-speed memory cards prevent recording interruptions and support the fast write speeds required for 4K or 5.3K capture. Investing in reliable power and storage solutions is less glamorous than buying a new mount, but it’s the unglamorous gear that keeps you shooting when conditions are perfect.
Protective Cases and Housings
Action photography happens in environments that punish equipment—saltwater spray, sand, mud, rain, extreme cold, and hard impacts are all part of the job. Protective housings shield your GoPro from water damage at depths beyond its native waterproof rating, while rugged carrying cases safeguard the camera and accessories during transport over rough terrain. Silicone sleeves absorb shock from drops and bumps during high-energy activities. If you regularly shoot in corrosive saltwater or dusty desert conditions, a dedicated housing isn’t optional—it’s insurance against losing an expensive camera to a single splash or fall. Choosing a housing that allows full access to buttons and ports means protection doesn’t come at the cost of usability.
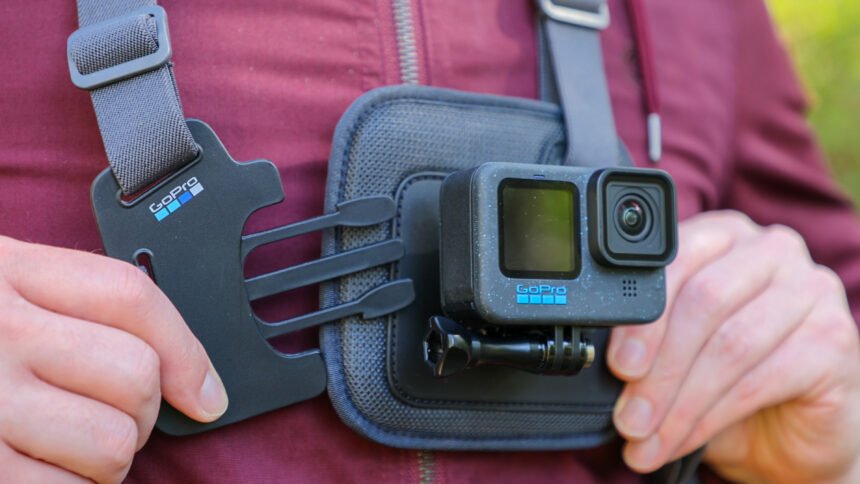
Versatile Tools like the Backpack Clip
Some of the most useful GoPro accessories are deceptively simple. The backpack clip, for example, attaches your camera to a shoulder strap, providing a stable, elevated angle that captures your journey hands-free. This is invaluable for hikers, travelers, and trail runners who need both hands available but still want continuous documentation of their surroundings. The clip rotates to adjust your shooting angle on the fly—tilted forward for trail views, angled sideways for landscape panoramas, or pointed slightly upward to include dramatic skies. Its lightweight, low-profile design means you barely notice it’s there, yet it delivers perspectives that feel cinematic and immersive. Accessories like this prove that the best gear isn’t always the most complex; sometimes a well-engineered clip outperforms a complicated rig simply because you’ll actually use it every time you head out the door.
A Step-by-Step Guide to Selecting Your GoPro Accessories
With so many options available, a structured approach saves you from impulse purchases and buyer’s remorse. Instead of grabbing whatever looks cool in an online store, follow a deliberate process that matches accessories to your actual needs. These three steps turn the overwhelming accessory market into a manageable decision-making framework that leads to smarter investments and better photography outcomes.
Step 1: Assess Your Photography Style and Goals
Before browsing a single product listing, sit down and honestly evaluate how you use your GoPro. Write down the three to five activities where you shoot most frequently—mountain biking, snorkeling, travel vlogging, skateboarding, or whatever defines your typical sessions. Then ask yourself what’s currently limiting your results. Are your images consistently blurry during fast movement? Are you missing shots because you can’t mount the camera where you need it? Do your sessions end prematurely due to dead batteries? Each frustration points directly to an accessory category that deserves your attention first. A surfer who constantly battles foggy lenses and water damage needs a dive housing before a selfie stick, while a hiker who wants effortless documentation should prioritize a backpack clip or chest mount over a gimbal. Defining your goals—whether that’s sharper stills, longer shooting windows, or more creative angles—creates a prioritized shopping list grounded in real-world need rather than marketing hype.
Step 2: Research and Compare Accessory Options
Once you know what categories to focus on, dig into specific products with a critical eye. Start by confirming compatibility with your exact GoPro model, since mounting systems and housing dimensions can vary between generations. Read user reviews from photographers who shoot in conditions similar to yours—a five-star review from a casual tourist won’t tell you much if you need gear that survives whitewater rapids. Compare build quality, weight, and ease of use across at least three options in each category before committing. Set a realistic budget, but resist the temptation to default to the cheapest option for critical gear like protective housings or memory cards, where failure has real consequences. Official GoPro accessories offer guaranteed compatibility, while reputable third-party brands like Ulanzi often deliver comparable performance at lower cost with well-engineered designs tailored for action shooters. Balance these trade-offs based on how demanding your shooting environment is.
Step 3: Test and Integrate Accessories into Your Workflow
Buying the right accessory is only half the equation—learning to use it effectively completes the picture. When new gear arrives, take it on a low-stakes practice session before relying on it during an important shoot. Mount your camera, adjust the angles, and shoot test footage in conditions that mimic your typical environment. Pay attention to how quickly you can set up and break down the accessory, because gear that takes five minutes to attach in a parking lot becomes a liability when conditions change fast on a mountainside. Integrate one new accessory at a time rather than overhauling your entire kit at once; this lets you isolate what’s actually improving your results versus what’s adding unnecessary complexity. Over several sessions, you’ll develop an intuitive sense of which tools earn a permanent spot in your bag and which ones stay home. This gradual, hands-on approach builds confidence and ensures every piece of gear you carry has proven its value in the field.
Tips to Elevate Your Action Photography Techniques with GoPro
Having the right accessories is essential, but knowing how to use them alongside smart shooting techniques is what truly separates forgettable snapshots from gallery-worthy action photography. Gear creates opportunity—technique capitalizes on it. The following tips help you squeeze maximum creative potential from your GoPro and accessory setup, regardless of your experience level.
Mastering Angles and Perspectives
The angle you choose determines the emotional impact of every shot. Mounting your GoPro low to the ground with a jaw clamp on a skateboard or bike frame creates a dramatic sense of speed, making the viewer feel like they’re hurtling forward alongside the action. Helmet and head-strap mounts deliver authentic first-person perspectives that pull audiences into the experience, while a chest mount adds context by including the subject’s arms and body in the frame. Don’t default to a single favorite angle—experiment during each session by repositioning your mount between runs, laps, or attempts. Combine a backpack clip for wide environmental shots during approach hikes with a handheld grip for tight, intentional compositions once the action starts. Shooting the same moment from two different angles during practice sessions teaches you which perspectives carry the most visual energy for each specific activity.
Optimizing Settings for Different Environments
Your camera settings should shift as your environment changes. For fast-paced sports like downhill skiing or motocross, shoot at higher frame rates—120 or 240 frames per second—so you can extract tack-sharp still frames from slow-motion playback. In low-light situations such as dawn surf sessions or forest trail runs, drop to a lower frame rate and increase the resolution to allow more light per frame. Use linear lens mode instead of wide-angle when you want to reduce distortion for cleaner, more natural-looking compositions. Enable ProTune to gain manual control over white balance, ISO limits, and sharpness, which gives you far more flexibility during post-processing. Spending ten minutes adjusting settings before a shoot prevents hours of frustration trying to salvage poorly exposed or motion-blurred images afterward.
Enhancing Shots with Lighting and Post-Processing
Natural light is the most powerful tool in any outdoor photographer’s arsenal, and it costs nothing. Shooting during golden hour—the first and last hour of sunlight—wraps action subjects in warm, directional light that adds depth and dimension to every frame. When midday sun creates harsh shadows, position your camera so the light falls across your subject from the side rather than directly overhead, which reveals texture and muscle definition in athletes. After the shoot, basic post-processing transforms good captures into exceptional ones. Adjusting contrast and clarity in free tools like GoPro’s own app or Lightroom Mobile sharpens details, while subtle color grading sets the mood—cooler tones for ocean and snow scenes, warmer palettes for desert and sunset adventures. Cropping tighter on your subject eliminates distracting background elements and strengthens composition. Even five minutes of editing per image dramatically improves the final output, making your accessory investment pay off with polished, share-ready results.
Build Your GoPro Kit and Start Capturing Stunning Action Shots
Choosing the right GoPro accessories doesn’t have to feel like navigating a maze. It starts with understanding that accessories aren’t optional extras—they’re the tools that unlock your camera’s full potential, transforming shaky, limited footage into sharp, creatively composed action photography. From mounts and gimbals that deliver stability and unique perspectives, to power and storage solutions that keep you shooting through critical moments, to protective housings that let you push into harsh environments without fear—each category serves a specific purpose in your creative workflow.
The step-by-step approach outlined here gives you a reliable framework: assess your shooting style honestly, research options with a critical eye, and test new gear in real-world conditions before depending on it. Pair those smart accessory choices with intentional techniques—experimenting with angles, dialing in your settings for each environment, and refining your images through post-processing—and you’ll see a dramatic leap in the quality of your results. Start with the one accessory that solves your biggest current frustration, master it, then build from there. Every legendary action photograph began with a photographer who showed up prepared, equipped, and ready to capture the moment. Now go make that photographer you.