Your roof is your home’s first line of defense against the elements. But what happens when that armor develops cracks and leaks? One common culprit behind roofing woes is fix flashing on roof issues. These are often overlooked, yet they can lead to significant damage if not addressed promptly. Understanding how to effectively fix flashing issues on your roof not only protects your home but also saves you from costly repairs down the line.
In this guide, we’ll delve into everything you need to know about roof flashing, including why it fails and how to tackle any problems head-on. Whether you’re a seasoned DIYer or just starting out, we’ve got tips and insights tailored for everyone. Let’s dive in!
Understanding Roof Flashing
Roof flashing is a crucial component of your roofing system. It acts as a barrier that directs water away from vulnerable areas, such as chimneys, vents, and valleys. Made from materials like aluminum or galvanized steel, flashing prevents leaks by ensuring that water flows off the roof instead of seeping into your home.
There are different types of flashing designed for specific applications. For example, step flashing is typically used around chimneys, while apron flashing helps channel rainwater away from walls. Understanding these functions can help you identify potential problems before they escalate.
Proper installation is key to effective performance. If installed incorrectly or if the materials have degraded over time, even the best-quality flashing can fail. Regular inspections will help ensure that your roof remains watertight and protected against moisture intrusion.
Common Causes of Flashing Issues
Flashing issues can arise from a variety of sources. One common culprit is improper installation. If flashing isn’t secured correctly, it may allow water to seep in.
Weather also plays a significant role. Heavy rains or high winds can displace or damage flashing over time, leading to leaks.
Another factor is age. Older roofs with worn-out materials are more susceptible to problems like rust and corrosion around the flashing areas.
Additionally, debris accumulation can be problematic. Leaves, branches, and dirt may obstruct drainage paths, causing water to pool near the flashing and increasing the risk of leaks.
Temperature fluctuations can impact roofing materials too. Expansion and contraction could weaken seals around flashings after repeated cycles.
Signs of Flashing Problems
Flashing issues often reveal themselves through subtle signs. A common indicator is water stains on your ceiling or walls. These can signal leaks originating from faulty flashing.
Another telltale sign is rusted or corroded metal flashing. If you notice discoloration, it might be time to inspect further.
Inspect the roof around chimneys and vents too. Cracked caulk or gaps in the seams are red flags that should not be ignored.
Additionally, if shingles appear warped or damaged near flashings, structural problems may exist beneath the surface.
Pay attention to any unusual sounds during rainstorms; dripping noises could indicate active leaks linked to compromised flashing components.
Being vigilant about these signs can save you from costly repairs down the line. Regular inspections help catch problems early, ensuring your home stays protected against water intrusion.
Steps to Fix Flashing Issues
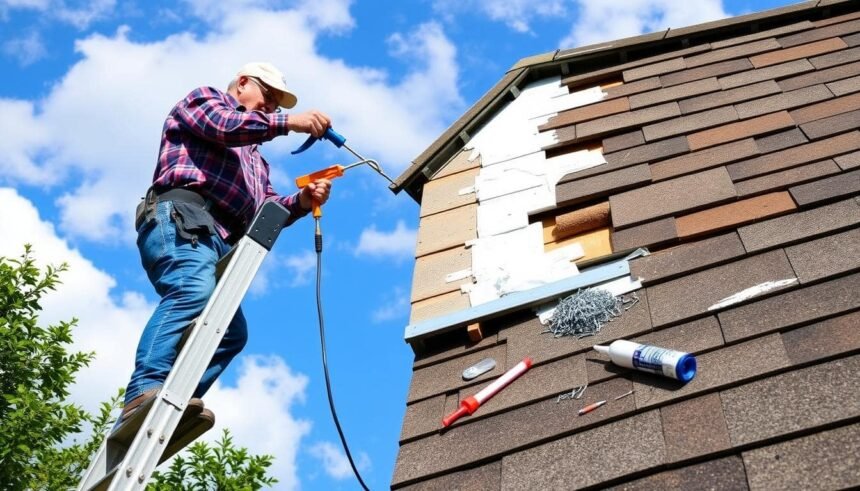
Start by identifying the specific area of your roof where the flashing issue resides. Inspect closely for cracks, rust, or gaps that may be allowing water intrusion.
Next, carefully remove any damaged flashing using a pry bar or hammer. Take care not to damage surrounding materials during this process.
Clean the area thoroughly to ensure proper adhesion of new materials. Use a wire brush to eliminate debris and old sealant.
Once clean, cut new flashing pieces to size. These should fit snugly against the roofing material and extend beyond edges to prevent leaks.
Secure the new flashing in place using roofing nails at regular intervals. Apply waterproof sealant along seams for extra protection against moisture infiltration.
Inspect your work carefully before considering it complete. Look for any visible imperfections that could lead to future problems down the line.
Materials and Tools Needed
When tackling flashing issues on your roof, having the right materials is crucial. You’ll need roofing cement or sealant to repair any gaps or cracks effectively. Choose a product specifically designed for roofs to ensure durability.
Next, gather metal flashing pieces that match your existing roof material. Aluminum and copper are popular choices due to their longevity and resistance to rust.
Don’t forget safety gear! A sturdy ladder will help you access those tricky spots with ease. Use gloves and goggles for protection while working with sharp materials or chemicals.
A caulking gun will be handy when applying sealants. Make sure it’s in good condition for smooth application. With these tools at your side, you’ll be well-equipped to address any flashing problems that may arise on your roof.
DIY vs Hiring a Professional
When it comes to fixing flashing issues on your roof, you face a crucial choice: DIY or hire a professional.
Taking the DIY route can be tempting. It offers the thrill of hands-on work and potential savings on labor costs. If you have some experience with roofing repairs and feel comfortable climbing ladders, tackling minor flashing problems might be within reach.
However, the risks are significant. One misstep could lead to further damage or safety hazards. Additionally, improper installation may void warranties or create leaks down the line.
On the other hand, hiring a professional brings expertise and peace of mind. Skilled roofers understand nuances that can escape an amateur’s eye. They also possess the right tools for efficient and safe repairs.
Consider your comfort level and budget before deciding which path to take for those pesky flashing issues on your roof.
Preventative Measures for Future Issues
Regular maintenance is key to preventing flashing issues. Schedule routine roof inspections at least twice a year, preferably in spring and fall. This proactive approach can catch potential problems before they escalate.
Keep gutters clean and free of debris. Clogged gutters can lead to water pooling and increased pressure on your roof’s flashing. This simple task greatly reduces the risk of damage over time.
Consider using high-quality materials during installation or repairs. Investing in durable flashing materials like aluminum or copper will stand up better against weather elements compared to cheaper options.
Sealant application also plays an important role. Regularly inspect existing seals for cracks or wear, reapplying sealant as needed helps maintain watertight integrity around vents, chimneys, and valleys.
Educate yourself about local climate conditions too. Understanding how factors like heavy rain or snow affect your area allows for tailored preventive measures that target specific risks associated with those environmental challenges.
Conclusion
Flashing is an essential component of your roof, acting as a barrier against water intrusion. Understanding its role can help you maintain the integrity of your home. When flashing issues arise, they may lead to severe consequences if left unchecked. Knowing the common causes and recognizing signs early can save you time and money.
Fixing flashing problems often requires some basic tools and materials, making it possible for many homeowners to tackle this issue themselves. However, certain situations might be better handled by professionals with experience in roofing repairs.
Taking preventative measures will also help ensure that flashing remains effective over time. Regular inspections and maintenance can go a long way in preventing future problems.
Addressing flashing issues promptly not only protects your roof but also enhances the overall comfort of your home. Whether you choose to DIY or hire someone experienced, taking action is crucial for safeguarding your investment and maintaining peace of mind regarding roof performance.