Installing a well sediment filter is a practical and cost-effective way to ensure that the water from your well is clean and free from unwanted particles. Sediment filters help protect your plumbing and appliances from damage caused by sand, silt, dirt, and rust. This step-by-step guide will walk you through installing a good sediment filter on your own.
Materials and Tools You Will Need for Installation
- Well, the sediment filter kit
- Pipe cutter or hacksaw
- Adjustable wrenches
- Teflon tape
- PVC primer and cement (if using PVC pipes)
- Bucket or container
- Marker or pencil
- Safety gloves and goggles
- Plumber’s tape
- Shutoff valve (if not included in the kit)
Step 1: Select the Right Location

Choose a location for the well sediment filter that is easily accessible for maintenance and filter replacement. The ideal spot is between the well pump and the pressure tank. This position ensures that the water is filtered before it enters your home’s plumbing system.
Step 2: Turn Off the Water Supply
Before starting the installation, turn off the main water supply to prevent water flow. Open a faucet to release any remaining pressure in the system. Place a bucket or container under the section of the pipe where you will be cutting to catch any water that may spill.
Step 3: Cut the Pipe
Using a pipe cutter or hacksaw, cut the pipe at the chosen location. Make sure to cut straight to ensure a proper fit for the filter housing. Be prepared for some water to spill out, so keep the bucket or container handy.
Step 4: Prepare the Pipe Ends
Clean the ends of the cut pipes to remove any burrs or debris. If you are using PVC pipes, apply PVC primer to the ends of the pipes and the inside of the fittings. Allow the primer to dry before applying PVC cement to the same areas.
Step 5: Install Shutoff Valves (Optional)
Installing shutoff valves on either side of the filter is optional but highly recommended. Shutoff valves make it easier to perform maintenance and replace the filter without shutting off the entire water supply. Attach the shutoff valves to the pipe ends using Teflon tape on the threads to ensure a tight seal.
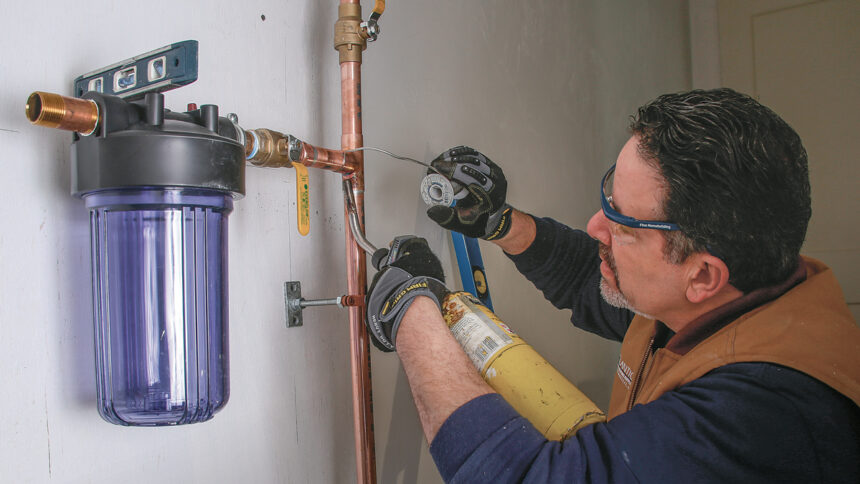
Step 6: Attach the Filter Housing
Wrap Teflon tape around the threads of the pipe ends or the shutoff valves. Attach the filter housing to the pipe ends, ensuring that the inlet and outlet ports are correctly aligned with the water flow direction. Tighten the connections with adjustable wrenches, but be careful not to overtighten and damage the fittings.
Step 7: Insert the Filter Cartridge
Open the filter housing and insert the well sediment filter cartridge. Follow the manufacturer’s instructions for proper placement and orientation of the cartridge. Once the cartridge is in place, close the housing securely.
Step 8: Check for Leaks
Slowly turn on the main water supply and check for any leaks around the filter housing and connections. If you notice any leaks, turn off the water supply and tighten the connections as needed. If leaks persist, consider reapplying Teflon tape or checking for damaged fittings.
Step 9: Flush the Filter
After ensuring there are no leaks, flush the filter by running water through it for a few minutes. This step helps remove any loose particles and air bubbles from the system. Check the manufacturer’s instructions for the recommended flushing time.
Step 10: Test the Water Quality
Once the filter is installed and flushed, test the water quality to ensure that the well sediment filter is working correctly. You can use a water testing kit or send a water sample to a laboratory for analysis. The filtered water should be clear and free of sediment particles.
Some Maintenance Tips
Regularly check the filter cartridge and replace it according to the manufacturer’s recommendations or when you notice a decrease in water pressure.
Keep an eye on the filter housing for any signs of wear or damage and replace it if necessary.
Periodically inspect the shutoff valves and connections to ensure they remain leak free.
Conclusion
Installing a good sediment filter is a straightforward DIY project that can significantly improve the quality of your well water. By following this step-by-step guide, you can ensure a successful installation and enjoy clean, sediment-free water in your home. Regular maintenance and timely filter replacement will keep your system running smoothly and protect your plumbing and appliances from potential damage.

