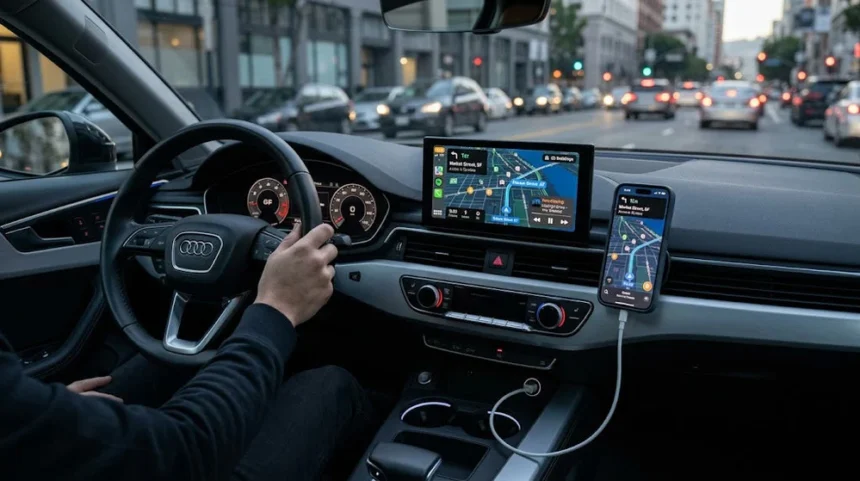
You’ve invested in a premium BMW or Mercedes, and now you want to bring it into the modern era with Apple CarPlay — only to find yourself staring at a glitchy home screen, distorted audio, or a display that simply refuses to cooperate. For tech-savvy owners of older luxury vehicles, this frustration is all too familiar. The culprit is often hiding in plain sight: the fiber optic cable network woven throughout your car’s entertainment system.
Unlike standard wiring, fiber optic cables carry both audio and data signals as pulses of light, making them incredibly efficient but surprisingly sensitive to interference, damage, and compatibility conflicts. When you introduce an aftermarket Apple CarPlay module into this ecosystem, even a minor mismatch or loose connection can cascade into display failures, audio dropouts, or a CarPlay home screen that never quite loads correctly.
This article cuts through the complexity. Whether you’re dealing with signal loss, screen resolution problems, or mysterious audio static, you’ll find clear, step-by-step guidance for diagnosing fiber optic issues, optimizing your OEM screen, and configuring your car entertainment system for a seamless CarPlay experience — without the guesswork that typically comes with retrofitting modern tech into a classic luxury ride.
Understanding Fiber Optic Cable Technology in Car Entertainment Systems
Fiber optic cables transmit data as pulses of light rather than electrical signals, which gives them a significant advantage in automotive environments where electromagnetic interference from the engine, alternator, and other electronics can wreak havoc on signal quality. BMW and Mercedes engineers recognized this early on, integrating fiber optic networks — most notably the MOST (Media Oriented Systems Transport) bus — into their premium vehicles to handle high-bandwidth audio and video data with minimal signal degradation over distance.
In practice, the MOST bus connects nearly every component in your car’s entertainment ecosystem: the head unit, amplifier, CD changer, navigation module, and display screen all communicate through a single ring-shaped fiber optic loop. Data travels around this loop in one direction, and every device both receives and passes along the signal. This architecture is elegant in a factory setup but becomes a liability when you introduce an aftermarket module, because breaking the loop — even briefly — can cause the entire system to lose communication.
Key components you’ll encounter during a CarPlay retrofit include the optical fiber cables themselves (thin, fragile strands typically terminated with plastic MOST connectors), the amplifier acting as the loop’s signal hub, and interface adapters like the MOST-to-analog converter that bridges your new module with the existing network. Terms like “loop bypass,” “optical signal strength,” and “MOST gateway” will come up repeatedly in installation guides. Understanding what these mean before you start pulling panels saves considerable troubleshooting time later and helps you communicate precisely with installers if professional help becomes necessary.
Common Fiber Optic Cable Issues Affecting Apple CarPlay Home Screen
When Apple CarPlay misbehaves in a fiber optic-equipped vehicle, the symptoms can range from mildly annoying to completely debilitating. The home screen might load partially before freezing, flicker in sync with engine RPM changes, or display a washed-out image with incorrect scaling. Audio issues often accompany these visual problems — you might hear crackling between tracks, experience sudden dropouts during calls, or find that CarPlay audio plays through the wrong speakers entirely. What makes diagnosis tricky is that these symptoms mimic software bugs, leading many owners to chase firmware updates or iPhone settings when the real problem is physical.
Connection Problems and Signal Loss
The MOST bus loop is only as strong as its weakest connection point. A single loose or partially seated optical connector — often disturbed during a previous repair or panel removal — can degrade the light signal enough to cause intermittent communication failures throughout the entire entertainment ring. Symptoms include a CarPlay home screen that appears briefly then goes black, audio that cuts out when the car hits a bump, or a head unit that takes unusually long to initialize after startup. Begin diagnosis by gently reseating every optical connector in the chain, starting at the amplifier and working toward the head unit. Use a fiber optic signal tester or simply hold a disconnected cable end up to a dim light — a healthy cable transmits a visible red glow, while a damaged or dirty strand shows dim or no output. Cleaning connector faces with a lint-free swab eliminates contamination that can scatter the light beam and mimic cable failure.
Compatibility with Aftermarket Upgrades
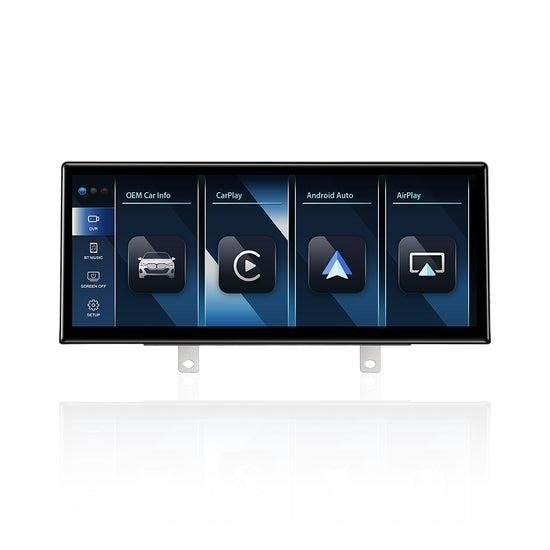
Older BMW and Mercedes models were never designed to accept CarPlay modules, so aftermarket interfaces must bridge two fundamentally different communication worlds. The most common mismatch occurs when an interface adapter doesn’t fully emulate the MOST device it replaces in the loop. The amplifier expects to see a specific device signature at each node, and if the CarPlay module presents an unrecognized handshake, the amplifier may mute outputs or refuse to pass audio data. Another frequent issue involves voltage tolerance — some early-generation fiber optic interfaces draw slightly more current than the original equipment, causing the OEM system to flag a fault and disable the connected component. Before purchasing an interface adapter, verify it explicitly lists compatibility with your vehicle’s model year and MOST bus version. Adapters from reputable brands like PEMP Car Audio typically include a “loop-through” feature that keeps the optical ring intact while tapping audio signals in parallel, which eliminates the most common source of system-wide failures during CarPlay integration.
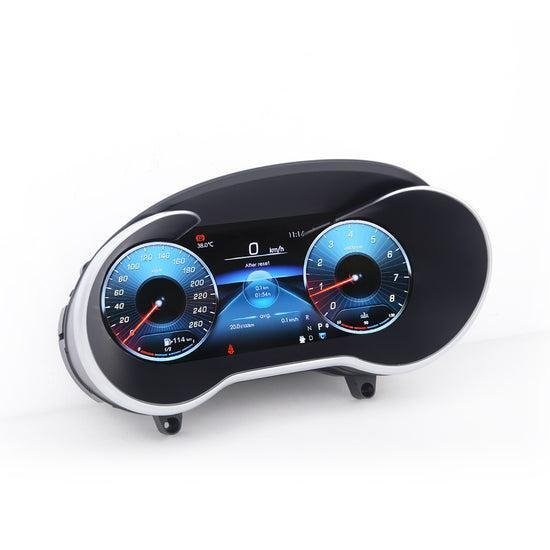
Optimizing OEM Screen Resolution for Enhanced Apple CarPlay Experience
The OEM screen in older BMW and Mercedes models was calibrated for the factory infotainment system, not for the pixel-dense interface Apple CarPlay expects. When you introduce a CarPlay module, the display often defaults to a resolution or aspect ratio that makes the home screen appear stretched, blurry, or letterboxed with black bars on either side. Fixing this requires a targeted adjustment of the screen’s output settings rather than any change on the iPhone side.
Start by accessing your vehicle’s hidden engineering or diagnostic menu. On most BMW models with the iDrive system, holding the menu button for ten seconds while the car is in accessory mode opens a service display where you can manually set output resolution. Mercedes COMAND systems typically require a specific button sequence — consult your model’s service documentation, as the combination varies by year. Once inside, look for display output or video format settings and match them to the native resolution your CarPlay module specifies in its installation manual, commonly 800×480 or 1024×600 for older OEM screens.
If the image remains soft after adjusting resolution, the issue may be scaling rather than raw pixel count. Many aftermarket CarPlay interfaces include a companion app or physical adjustment buttons that let you fine-tune the output signal’s horizontal and vertical scaling independently. Reducing overscan by even five percent can sharpen text and icon edges noticeably. For persistent color or brightness mismatches — where the CarPlay home screen looks washed out compared to the original interface — adjust the screen’s contrast and backlight settings within the same engineering menu. Always document your original settings before making changes so you can restore them if the adjustments create new problems.
Audio Troubleshooting in Fiber Optic-Based Car Entertainment Systems
Audio problems in fiber optic-equipped vehicles often feel disconnected from their actual cause. Static that appears only during phone calls, music that plays through the front speakers but not the rear, or complete silence after a CarPlay module installation — all of these trace back to how the MOST bus handles audio routing rather than anything wrong with the iPhone or the CarPlay app itself.
Start with cable integrity. A fiber optic strand that looks intact externally can still have internal micro-fractures that scatter the light signal just enough to corrupt audio data packets without fully breaking the connection. Disconnect each cable segment at its connector, inspect the polished end face for scratches or discoloration, and use a fiber optic power meter if available — signal strength below the manufacturer’s minimum threshold confirms a cable replacement is needed rather than further software adjustments.
Next, verify your audio source settings within the CarPlay interface itself. Navigate to Settings on the CarPlay home screen, confirm that the output volume isn’t routed to a source the OEM amplifier doesn’t recognize, and check that media audio and call audio are both enabled. Some aftermarket interfaces require you to select an analog audio input mode separately from the digital MOST signal, and missing this step mutes output entirely. Finally, test with a direct analog connection — temporarily bypassing the fiber optic loop using an aux-in adapter confirms whether the problem lives in the optical network or downstream in the amplifier and speaker wiring.
Step-by-Step Guide to Avoid Fiber Optic Cable Issues in Setup
A methodical approach before and during installation prevents the majority of fiber optic problems that plague CarPlay retrofits in older BMW and Mercedes vehicles. Follow these steps in order to build a reliable foundation rather than troubleshoot after the fact.
Begin with a full inspection of the existing fiber optic loop before installing anything. With the car in accessory mode, confirm that the factory system operates normally — all audio zones active, no warning messages on the head unit. This establishes a clean baseline. Then trace the MOST ring from the amplifier through each component, gently pressing each optical connector to ensure it’s fully seated. Any connector that moves or clicks into place during this check was a failure waiting to happen.
Before mounting the CarPlay module, configure your OEM screen resolution first. Access the engineering menu using your model’s specific button sequence, set the display output to match your module’s specified resolution, and confirm the image looks correct using the factory interface. Locking in these settings before introducing the new module means you can isolate display problems to the module itself rather than guessing at multiple variables simultaneously.
During installation, never leave the optical loop open longer than necessary. Connect the CarPlay module’s loop-through cables immediately after disconnecting the original device to minimize the window where the amplifier detects a broken ring. Once connected, power the system and run a quick audio check — play music through the CarPlay home screen, make a test call, and verify sound reaches all speaker zones. Document any anomalies immediately rather than assuming they’ll resolve on their own, since early identification narrows the diagnostic field considerably. Installers working with purpose-built CarPlay solutions from PEMP Car Audio often note that modules designed specifically for MOST bus environments reduce this diagnostic burden significantly, as they are engineered to present the correct device handshake from the moment they power on.
Getting the Most from CarPlay in Fiber Optic-Equipped Luxury Vehicles
Retrofitting Apple CarPlay into an older BMW or Mercedes doesn’t have to be a battle against your own car. The fiber optic MOST bus is a sophisticated system, but its behavior becomes predictable once you understand how it handles signal routing, device handshakes, and loop integrity. The owners who succeed with these installations share one habit: they treat the fiber optic network with the same care they’d give any precision component, inspecting connections before installation, verifying compatibility before purchasing adapters, and testing methodically rather than swapping parts at random.
OEM screen calibration and audio routing deserve equal attention. A properly adjusted display resolution transforms the CarPlay home screen from a blurry afterthought into a genuinely polished interface, while correct audio source configuration ensures every speaker zone performs as intended. Neither fix requires specialized tools — just access to your vehicle’s engineering menu and a willingness to document settings as you go.
The reward for this careful approach is a car entertainment system that feels factory-built rather than cobbled together. Your luxury vehicle keeps its premium character while gaining the navigation, communication, and media features that modern driving demands. With the right preparation and a clear understanding of how fiber optic technology behaves under aftermarket conditions, a seamless CarPlay experience is entirely within reach — no compromises required.