Introduction to Plasterboard and Screw Spacing
Plasterboard, also known as drywall or gypsum board, is a popular choice for creating smooth surfaces in homes and commercial spaces. Whether you’re embarking on a DIY project or working with professionals, understanding the nuances of plasterboard installation can make all the difference. One key aspect that often gets overlooked is screw spacing. Proper screw placement not only ensures a neat finish but also contributes to the durability and integrity of your walls and ceilings.
Imagine standing back to admire your work, confident that those sheets of plasterboard are securely fastened. Achieving that level of assurance begins with mastering the best practices for plasterboard screw spacing on walls and ceilings. In this guide, we’ll explore essential factors to consider when determining screw spacing, provide recommendations tailored to different applications, and share expert tips to help you nail it—quite literally! Let’s dive into the world of plasterboard installation together.
Factors to Consider When Determining Screw Spacing
When determining screw spacing for plasterboard, several factors come into play.
The type of wall or ceiling structure significantly influences how screws should be positioned. For instance, load-bearing walls require more support compared to non-load-bearing ones.
Moisture levels in the environment are another critical aspect to consider. In high-humidity areas, such as bathrooms and kitchens, closer screw placement can help prevent warping and sagging over time.
Additionally, the thickness of the plasterboard matters. Thicker boards may necessitate wider spacing due to their added strength.
Local building codes often dictate specific requirements for screw placement that you must adhere to ensure compliance and safety during installation. Each factor contributes uniquely but collectively determines optimum screw spacing for a secure finish.
Recommended Screw Spacing for Different Types of Walls and Ceilings
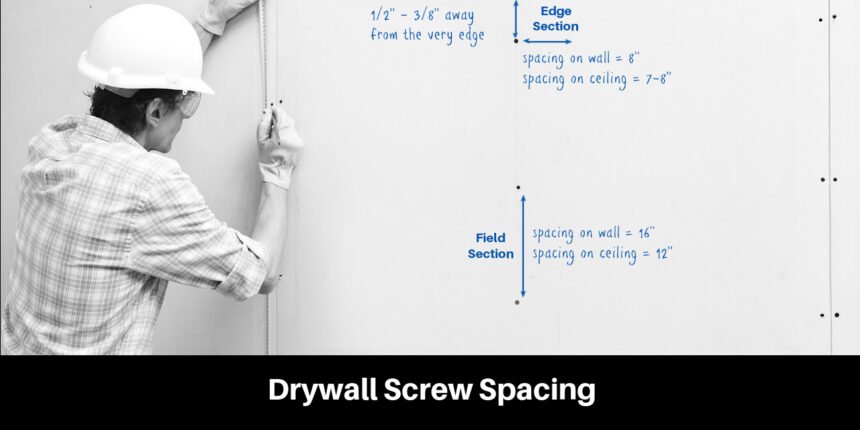
For drywall installation, screw spacing varies based on the type of wall or ceiling. Typically, a distance of 12 inches between screws is ideal for vertical walls. This helps ensure adequate support and prevents sagging.
When working with ceilings, especially those that are prone to weight-bearing loads such as light fixtures, a tighter screw spacing of about 8 inches is recommended. This adds extra stability and reduces the risk of cracks over time.
In areas like bathrooms or kitchens where moisture can be an issue, consider using special moisture-resistant plasterboard. Stick to the standard spacing guidelines but also ensure you use appropriate screws designed for humid conditions.
Always remember that if you’re installing thicker plasterboard sheets—like those used in soundproofing—you may need to adjust your spacing slightly closer together for optimal results. Adapting your approach ensures durability and longevity in your projects.
Tips for Achieving Proper Screw Spacing
To achieve proper screw spacing, start by marking guidelines on your plasterboard. Use a pencil or chalk line to create straight lines where the screws will go. This visual aid helps maintain consistency across your installation.
When placing screws, keep them about 12 inches apart along the edges and no more than 16 inches in the field of the board. Adjust these distances based on specific conditions such as wall type and load-bearing requirements.
Use a power drill with an adjustable clutch to prevent overdriving screws. This ensures that each screw sits flush with the plasterboard surface without damaging it.
Regularly check your spacing as you work. It’s easy for measurements to slip, especially on larger projects. A quick glance can save you from having to redo sections later on.
Always have extra screws handy for any adjustments needed during installation.
Common Mistakes to Avoid When Installing Plasterboard Screws
One common mistake is using the wrong type of screws. Plasterboard screws are designed specifically for this material; using wood or drywall screws can lead to issues.
Another frequent error involves incorrect spacing. Many installers neglect guidelines, which can compromise stability and finish quality.
Many people also forget to countersink their screws properly. Leaving them protruding means you’ll have bumps under your wall covering; an unsightly finish that could ruin the look.
Failing to check for stud placement is another pitfall. Not aligning with studs may result in weak spots, increasing the risk of cracking over time.
Rushing through the installation often leads to uneven screw placement. Take your time and ensure each screw sits flush with the plasterboard surface for a seamless appearance.
The Importance of Proper Screw Spacing for Long-Term Stability
Proper screw spacing is crucial for the stability of plasterboard installations. When screws are evenly spaced, they provide consistent support across the entire surface. This prevents sagging and warping over time.
Inadequate spacing can lead to weak points in the structure. These weak areas are more susceptible to damage from impacts or changes in humidity. Over time, this can result in cracks and other issues that compromise both aesthetics and functionality.
Additionally, correct screw placement enhances the overall durability of your walls and ceilings. It allows for better load distribution, ensuring that heavy items mounted on these surfaces remain secure.
With proper screw spacing, you’ll enjoy peace of mind knowing your plasterboard installation is built to last. Investing attention into this detail pays off down the line with fewer repairs needed and a longer-lasting finish.
Conclusion: Ensuring Success with Plasterboard Installation
Proper screw spacing is critical for plasterboard installation success. It affects the durability and appearance of walls and ceilings, ensuring they can withstand everyday wear and tear. By understanding the recommended spacings for various applications, you can avoid common pitfalls that might compromise your project.
Always remember to factor in elements such as board thickness, type of framing material, and whether you’re working on a wall or ceiling. Paying attention to these details helps achieve a seamless finish while minimizing issues like sagging or cracking over time.
Using the right tools also contributes significantly to achieving optimal screw placement. A measuring tape or chalk line can help mark guidelines before securing screws. This practice leads to neat rows that look professional and provide stability.
Avoiding mistakes during installation is just as important as following best practices for plasterboard screw spacing on walls and ceilings. Ensuring each screw is properly placed will not only enhance the aesthetic but also extend the life of your drywall setup, making it worthwhile both in effort and cost.
With careful planning and execution, you’ll ensure your plasterboard stands strong against typical stresses while maintaining an attractive appearance for years ahead. Your diligence now pays off later with lasting results you can be proud of every day.