Introduction to Bit Drills
Are you ready to tackle that DIY project involving tile surfaces? Whether you’re hanging a new showerhead or installing shelves, using bit drills effectively is essential. These specialized tools can make your job easier and ensure a clean finish on those beautiful tiles. However, drilling into bit drill tile requires precision and care to avoid cracks and chips. In this guide, we’ll explore valuable tips for using bit drills effectively on tile surfaces so you can achieve professional results with confidence. Get ready to wield your drill like a pro!
The Importance of Choosing the Right Bit Drill for Tile Surfaces
Selecting the right bit drill is crucial when working with tile surfaces. Not all bits are created equal, and using the wrong one can lead to damage or poor results.
Tiles are often hard and brittle. A standard drill bit may struggle, risking cracks or breakage. Diamond-tipped bits are specifically designed for this purpose. They provide precision while minimizing the risk of chipping tiles.
Additionally, consider the size of your holes. Specialty bits come in various diameters to accommodate different needs—be it for plumbing installations or hanging fixtures.
Investing time in choosing the proper bit will save you frustration during installation. It enhances efficiency and ensures a professional finish on your project without compromising quality.
Preparing the Tile Surface for Drilling
Before you start drilling, it’s essential to prepare the tile surface properly. Begin by cleaning the area where you’ll be working. Dust and debris can affect your drill’s performance and lead to uneven holes.
Next, inspect the tile for any cracks or imperfections. Drilling into damaged tiles can cause further breakage, so it’s best to avoid those areas altogether.
Once you’ve ensured a clean and intact surface, consider marking your drill points with a pencil or marker. This will help guide your bit and keep it from slipping during drilling.
Using painter’s tape over the marked spots can also enhance grip for your drill bit. This simple addition helps prevent chipping around the hole as you work.
Take time to set up a stable workspace. Securely holding both yourself and the tile in place is crucial for achieving accuracy while drilling through ceramic surfaces.
Proper Techniques for Using Bit Drills on Tile Surfaces
When drilling into tile surfaces, precision is key. Start by marking your desired spot with a pencil or tape. This helps guide the drill bit and prevents slipping.
Use a low-speed setting on your drill. High speeds can cause overheating and cracking of the tile. Always apply gentle pressure; let the bit do the work instead of forcing it through.
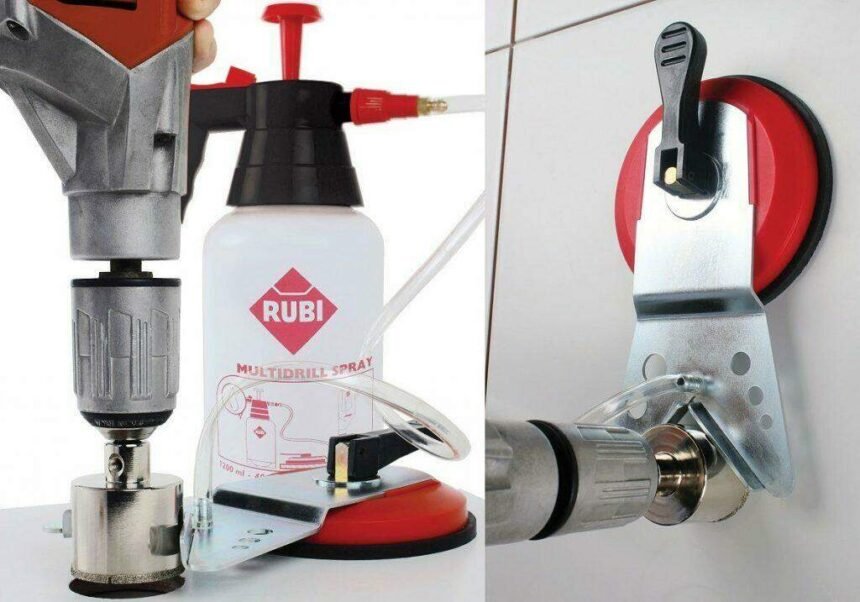
Consider using water to keep the area cool. A small spray bottle works wonders in preventing heat buildup while ensuring smooth drilling.
Maintain an upright position for your drill as you begin to penetrate the surface. This alignment reduces stress on both tile and tool, enhancing accuracy.
Be patient during this process. Rushing often leads to mistakes that can damage not only your project but also your tools. Taking it slow ensures a clean result every time.
Common Mistakes to Avoid
When using bit drills on tile surfaces, several common mistakes can lead to frustration or damage. One major error is applying too much pressure while drilling. Tile is delicate, and excessive force can crack or chip the surface.
Another frequent pitfall is neglecting to use water as a coolant. Drilling generates heat, which can compromise both the drill bit and the tile itself. Always keep your work area moist to minimize this risk.
Using an incorrect drill speed also leads to trouble. A slow speed helps maintain control and prevents overheating, whereas too fast a pace may cause breakage.
Failing to mark your drilling spots accurately can result in misaligned holes. Take time to measure carefully before starting; precision saves both time and materials in the long run.
Tips for Maintaining and Storing Bit Drills
Caring for your bit drills is essential for longevity and performance. After each use, clean them thoroughly to remove debris and dust. A soft brush or cloth can work wonders in keeping the bits free from residue.
Store your bit drills in a dry, cool place. Using a dedicated storage case helps prevent damage. Avoid tossing them into a toolbox where they might get knocked around or chipped.
Keep track of which bits are used most often and consider organizing them by size or type within their storage container. This makes it easier to find what you need quickly during projects.
If you notice any wear, replace the bits promptly to maintain drilling efficiency. Dull bits can lead to frustration and damage not only the tile but also your tools. Always invest time in maintenance; it pays off with better results on every project.
Conclusion
When it comes to using bit drills on tile surfaces, the right approach can make all the difference. Selecting a high-quality bit drill designed specifically for tiles is crucial. This choice ensures clean cuts and minimizes damage to your precious tiles.
Preparing your surface correctly cannot be overstated. A stable and well-marked area helps prevent any slips or mistakes during drilling. Employing proper techniques will lead to better results—remember to start slowly, apply even pressure, and keep your drill at an appropriate angle.
Avoid common pitfalls like rushing through the process or failing to use lubrication; these mistakes can ruin both your tool and tile. Regular maintenance of your bit bit drill tile extends their lifespan significantly, ultimately saving you time and money in replacements.
By implementing these tips for using bit drills effectively on tile surfaces, you’ll enhance not only your craftsmanship but also ensure that every project turns out just as you envisioned it. Happy drilling!