Have you been trying to screen-record while using Apple Music to save your favorite songs, but are surprised to find out that there’s no audio and only a black screen? Well, your phone is not broken. Apple has implemented a security feature that disables audio when you’re using the built-in screen recorder in the Apple Music app.
At this point, you might be wondering how to screen record Apple Music to save the songs you like. Screen recording Apple Music web player is a possible solution. But you should open it on browsers such as Google Chrome or Firefox. Avoid using Safari, as you’ll likely run into the same issue. In this article, we will show you how to screen record Apple Music on PC and mobile devices. A bonus tip to directly get Apple Music downloaded is also available. Just keep reading!
How to Record Apple Music with Audio on Windows/Mac
If you’re using Windows or Mac, you could use a convenient solution – FonePaw Screen Recorder on your computer. It is a superb desktop recording software that allows you to capture your screen along with audio in the highest quality possible. Through its convenient and intuitive UI, you’ll be able to screen record Apple Music songs on your computer very easily.
It allows you to choose formats to export audio such as MP3, WMA, M4A, and AAC. Video export formats include MP4, MOV, AVI, and more. Before exporting them locally, you can also trim and preview the recordings, so that you can cut out the unwanted parts from your Apple Music recording.
Below, we’ll take a look at steps to follow to use FonePaw Screen Recorder to start recording Apple Music:
Step 1: Install the app and launch it on your computer. Then, select ‘video recorder’ from the home screen.

Step 2: Now, customize your recording preferences. Ensure that the internal volume is turned up, and you’ll be able to access the audio from the Apple Music web player in your recordings.

Step 3: To further customize the output such as file format, codec, quality, and frame rate, you can head to the advanced settings section.

Step 4: Now, open your browser such as Chrome or Firefox (avoid Safari), and log into Apple Music. Find the song you want to record, and once you’re done making adjustments, return to the home screen and click on the red ‘rec’ button.

Step 5: After you’re satisfied with the recording, click on the stop button from the panel and click on save to keep your recording locally.

How to Screen Record Apple Music on iPhone
When you’re using an iPhone, you can screen record using the in-built feature. The advantage here is that you don’t need to download and learn how to use a new app to start recording. It is quite easy to start recording your screen using the built-in recorder on iPhones.
Here are the steps you should follow to screen record Apple Music on iPhone:
Step 1: Swipe down on the home screen from the top right and open the Control Center.
Step 2: Touch and hold the screen record button. It’ll ask you which app can access the screen record feature. Click on Apple Music.

Step 3: Click on your browser – Chrome, Opera, or Firefox. Avoid using Safari as you can’t screen-record Apple Music there. Once the countdown is over, the screen will be recorded. Open the song you want to screen record on the browser app, and let it play.
Step 4: Once you’re done, open the Control Center again and tap the red blinking icon to complete the process. The file can now be accessed under “Video” > “Screen Recordings”.
How to Screen Record Apple Music on Android
As an Android user, you might be using Apple Music if you already have an iPhone, or maybe you prefer the Lossless Audio feature, which Spotify doesn’t have. In either case, there’s a convenient app for how to screen record Apple Music.
The AZ Recorder app is completely free to download from Google Play and lets you record crystal-clear audio through your device.
Here are the steps you should follow to start screen recording with AZ Recorder:
Step 1: Install the app from Google Play on your Android device.
Step 2: Once the app is installed, launch it. You’ll see options to screen record, take a screenshot, live stream, and more. From here, tap ‘record’ and confirm your decision to start recording.
Step 3: Now, open Apple Music on your browser such as Google Chrome or Firefox (don’t use Safari), and log in using your Apple ID. Find the song you want to record, and let it play on the browser while the screen records.
Step 4: Once you’re done recording, swipe down to access the notifications bar, and press the stop button.
Tip: Get Lossless Apple Music Tracks as Local Files
Screen recording on your device to get your favorite songs offline is really inconvenient, to be honest. Not only does it store songs as videos which take up more space, which means you’ll have to convert them to audio separately. But it also makes it very difficult to organize your tunes. Thankfully, there’s a convenient solution that bypasses the need to screen record in the first place.
TuneFab is one of the best multimedia software providers on the market, bringing solutions for all major streaming providers, such as Spotify, Apple Music, Amazon Prime Music, Deezer, Pandora, and YouTube Music. And using their most powerful creation, TuneFab All-in-One Music Converter, you can seamlessly convert your favorite Apple Music songs.
It allows you to convert Apple Music to universal MP3, WAV, M4A, AAC, and more. In addition, it is 35X faster than other converters on the market, allowing you to save a lot of time that would have been spent converting video to audio while using screen recordings.
Outstanding Features of TuneFab’s All-in-One Music Converter
|
Now, we’ll go over the steps to download your favorite Apple Music tracks using the TuneFab All-In-One Music Converter.
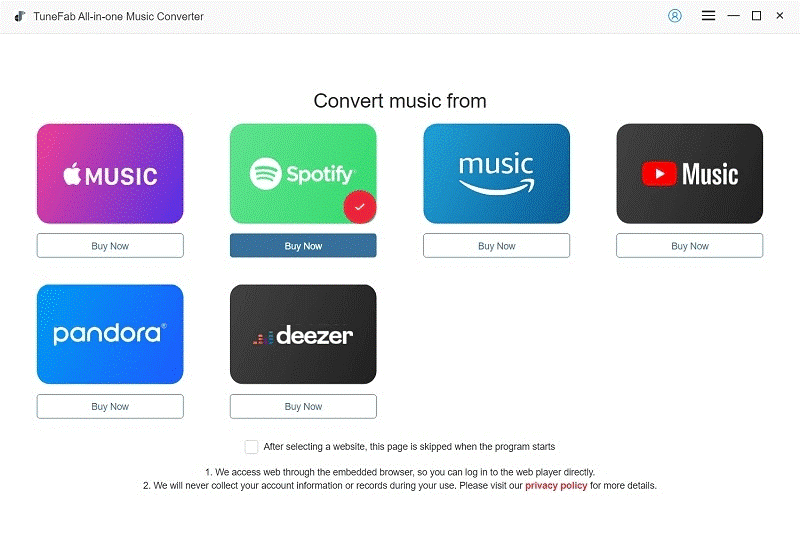
Step 1: Install the TuneFab All-in-One Music Converter on your PC or Mac. Then, choose Apple Music as your streaming platform and log in to the web player using your Apple ID.
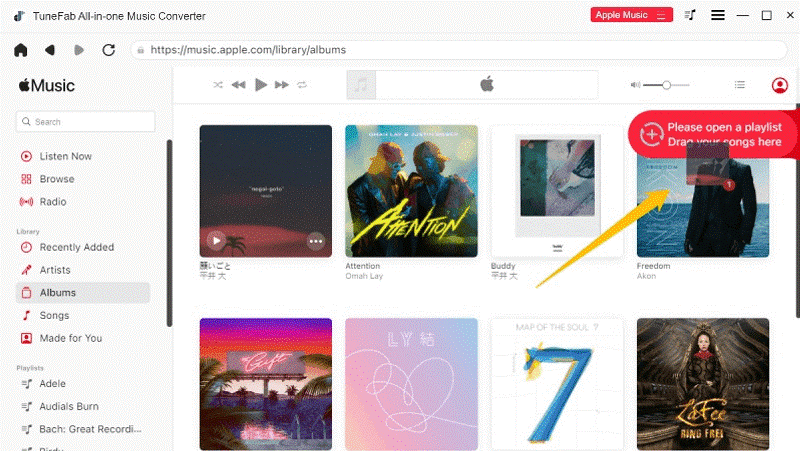
Step 2: You could organize your songs in a playlist for convenient access. Or, drag and drop your songs to the right-hand side panel with the ‘+’ sign.
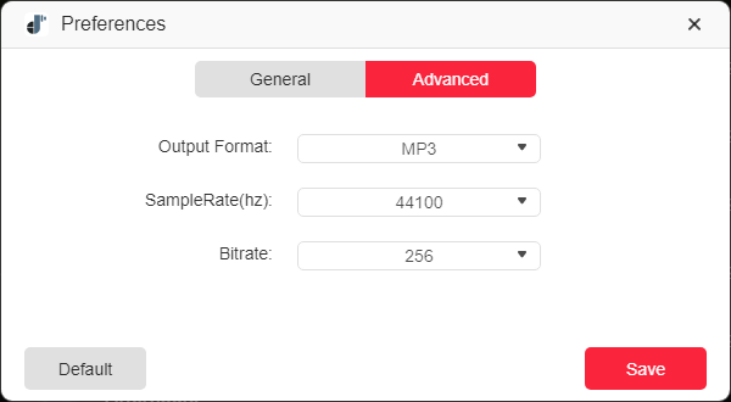
Step 3: Choose your preferred download format by navigating to “Menu” > “Preferences” > “Advanced”. Here, you can change the output format, bitrate, and sample rate as required.
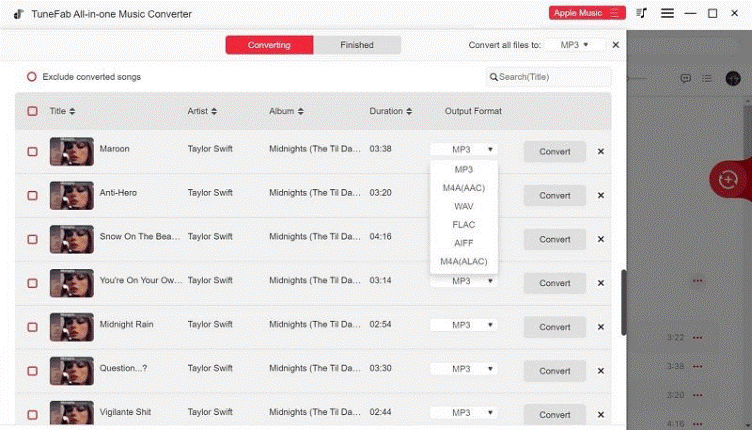
Step 4: Once you are satisfied with your song selection and the format for the output, simply click ‘Convert All’ to start the download process.
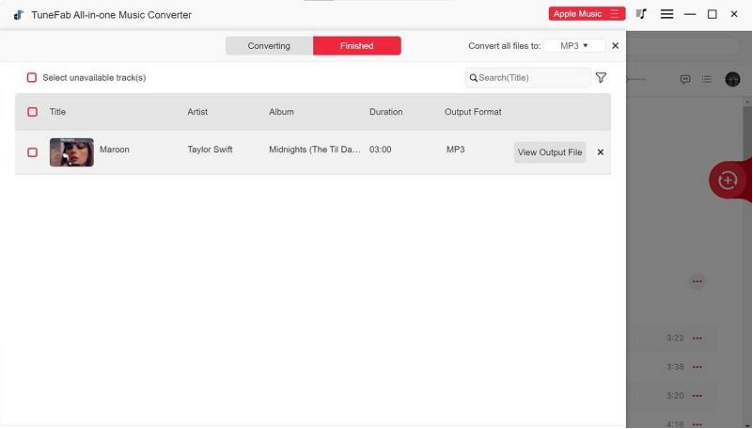
Step 5: Click on ‘View Output File’ at the bottom of the page, or next to the song you want to play to navigate to its location and start playing your newly downloaded music.
Conclusion
Saving your favorite songs doesn’t have to be a big challenge. By using FonePaw Screen Recorder on PC/Mac and AZ Recorder on Android, you have convenient solutions for how to screen record Apple Music with audio. If you’re wondering how to screen record Apple Music on iPhone, the solution is to use the built-in feature.
However, by far, the best way to download songs from Apple Music is to use TuneFab All-in-One Music Converter. It allows you to download and save your favorite songs in MP3 format without compromising on quality and lets you retain the song’s ID3 tags for easy categorization as well.
