If you’ve ever walked barefoot across a warm kitchen floor in the middle of winter, chances are you’ve already experienced the quiet luxury of underfloor heating. But what most homeowners don’t see—or think about—is the network of pipework working behind the scenes to keep things toasty.
Whether you’re building a new home or upgrading an existing one, understanding how underfloor heating pipework functions can save you a lot of time, money, and frustration. In this guide, we’ll look at how these systems are installed, what materials are best, and how to keep everything running smoothly for years to come.
What Is Underfloor Heating Pipework, Really?
Let’s start simple. Underfloor heating works by circulating warm water through a network of pipes embedded beneath your flooring. This network replaces the traditional radiator setup, freeing up wall space and providing more even heat distribution.
Most systems are either “wet” (water-based) or “dry” (electric), but this guide focuses on wet systems—the kind that involves pipework.
Here’s the kicker: the quality of the pipework and the way it’s installed can make or break your heating system. Poor layout or cheap materials? You’re looking at uneven heating or, worse, costly repairs.
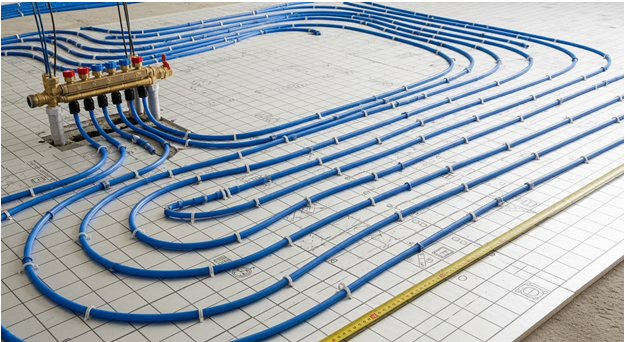
Planning the Layout: Why Design Matters
Think of your underfloor pipework like roadways in a city. If the layout is chaotic or poorly thought out, traffic gets snarled. It’s the same with warm water flow.
The two most common layouts used by professionals are the serpentine (or meandering) pattern and the spiral (or snail) pattern.
- Serpentine is easier and quicker to install, but it can result in temperature variation across the floor.
- Spiral distributes heat more evenly but requires a more precise installation.
One real-world example: a contractor in Leeds installed serpentine pipework in a large open-plan kitchen without compensating for heat loss near the windows. The result? Toasty in the middle, chilly by the French doors.
Lesson learned: factor in room shape, insulation levels, and external walls when planning your layout.
Choosing the Right Materials: It’s Not One-Size-Fits-All
Pipework for underfloor heating typically comes in three flavours:
- PEX (cross-linked polyethylene)
- PERT (polyethylene raised temperature)
- MLCP (multi-layer composite pipe)
Here’s how they stack up:
- PEX is flexible, affordable, and widely used. It holds up well under pressure and heat but doesn’t always play nicely with UV exposure.
- PERT is similar to PEX but slightly more temperature resistant. It’s often chosen for higher-end systems.
- MLCP combines layers of plastic and aluminium. It holds its shape better and has low thermal expansion, making it a favourite among installers looking for long-term stability.
Pro tip: Always choose pipes that are oxygen barrier-rated. It prevents rust in your boiler and other components down the line.
Step-by-Step Installation Overview
Let’s walk through the typical installation process—not from a technical manual perspective, but from what actually happens on-site.
- Insulation Goes Down First
This stops heat from escaping into the ground. Most systems use rigid insulation boards like PIR or EPS. - Pipes Are Clipped In Place
Using fixing systems like clip rails or staple guns, pipes are secured in the chosen layout. This stage is where attention to spacing matters. The tighter the spacing, the warmer the floor—but more pipe means more cost. - Pressure Testing
Before any screed goes over the top, the system is pressure tested—usually at 6 bar—to make sure there are no leaks. Skipping this step can mean disaster once the floor is sealed. - Screed Layer or Board Covering
A wet screed (usually sand and cement) or a dry board (like gypsum) is laid over the pipes to encase them. This helps distribute the heat across the floor surface.
Real-life insight: A builder I know once forgot to pressure-test a small bathroom loop before pouring the screed. One month later, the homeowner called about rising damp. Turns out the pipe had a pinhole leak. They had to rip up the tiles, dig into the screed, and start over. A costly mistake for something that takes 30 minutes.
Best Flooring Types to Use with Underfloor Heating
Now that your pipework is laid and tested, what’s going on top matters just as much. The type of flooring you choose affects how well the heat is transferred and how comfortable your home feels.
- Tile and stone: These are top choices because they conduct heat extremely well and retain it longer.
- Laminate and engineered wood: These can work beautifully too—but check manufacturer specs for maximum temperature tolerance.
- Carpet: It’s not off-limits, but it acts as insulation, so you’ll need a thinner underlay and a lower tog value to let the warmth through.
- Solid hardwood: Not ideal, as it can expand and contract too much with heat. It might look great but can cause headaches down the line.
Tip from an installer: Always tell your flooring supplier you’re using underfloor heating. They’ll guide you to compatible options, and it avoids warranty issues later.
Common Installation Mistakes (and How to Avoid Them)
Even with a great system design, things can go sideways during installation. Here are the most common pitfalls—and how to sidestep them:
- Inconsistent pipe spacing: Leads to hot and cold spots across the floor. Use pipe spacers and double-check before screeding.
- Not allowing for expansion: Especially in large areas. Leave perimeter expansion joints or you’ll end up with cracks later.
- Forgetting zone control: Heating a bathroom the same way you heat a lounge? That’s not efficient. Zoning gives you better comfort and lower bills.
- Covering the manifold: It might not be pretty, but make sure it’s accessible. You’ll need it for future servicing.
One homeowner in Kent ended up with a £2,000 repair bill when their manifold was boxed in behind a tiled wall. When a valve started leaking, it meant tearing the wall open just to get to it.
Maintenance Tips for Long-Term Efficiency
Underfloor heating doesn’t need constant babysitting, but a bit of upkeep goes a long way. Here’s what you should know:
- Annual system check: Have a professional inspect the system annually. It’s like an MOT for your heating.
- Bleed air from the system: Trapped air can reduce efficiency or cause cold patches. Most manifolds come with air vents—use them.
- Monitor water pressure: The pressure gauge should sit between 1 and 2 bars. If it drops below that, you might have a leak or need a top-up.
- Look out for sudden cold zones: If a specific room starts feeling colder, it might be an airlock or a valve issue.
Most issues are minor when caught early. And unlike radiators, once your underfloor heating system is running smoothly, you barely notice it’s there—until something’s off.
When to Call a Professional
DIY installation might be tempting, especially with countless tutorials online. But this isn’t flat-pack furniture—it’s your home’s heating system. Here’s when it pays to get a pro:
- You’re unsure about pipe layout calculations
- Your floor area has complex shapes or multiple zones
- You’re connecting to an existing heating system
- You want it done quickly and backed by warranty
Also, many insurance policies only cover professionally installed systems. So even if you’re handy, it’s worth weighing the long-term risks.
Practical Takeaways
Let’s wrap up with a few things you’ll want to remember if you’re serious about underfloor heating:
- Don’t cut corners on pipe quality. Choose pipes with a long lifespan and oxygen barriers.
- Plan your layout based on the room, not just square footage. Windows, doors, and insulation affect how heat spreads.
- Test before you cover anything up. A few hours spent pressure-testing could save thousands later.
- Use the right flooring. Some materials pair better with underfloor heating than others.
- Maintenance is minimal, but not zero. Keep an eye on pressure, and get it checked yearly.
Underfloor heating isn’t just a luxury—it’s an energy-efficient way to heat your home that feels natural and modern. When done right, it offers years of comfort with very little fuss. The key is in the pipework: get that part right, and the rest falls into place.