The kitchen sink is one of the busiest plumbing fixtures in any home. When installing a new sink or remodeling a kitchen, you’ll often need to plumb not just the sink itself, but also integrate a garbage disposal and dishwasher. While this might sound like a complex task, with the right tools and a step-by-step approach, it’s a manageable DIY project.
Tools and Materials You’ll Need
To successfully plumb your kitchen sink with garbage disposal and dishwasher connections, gather the following tools and parts:
- Adjustable wrench
- Basin wrench
- Plumber’s putty
- Pipe tape (Teflon tape)
- Bucket or pan
- P-trap assembly
- Tailpiece and extension pipes
- Garbage disposal unit
- Dishwasher drain hose
- Air gap (if required by code)
- Flexible supply lines
- Silicone caulk
Step 1: Turn Off the Water Supply
Always begin by shutting off the water supply. This includes both the hot and cold water valves under the sink. If needed, turn off the home’s main water valve. Open the faucet to relieve any pressure and allow remaining water to drain out.
Place a bucket underneath the existing plumbing to catch any residual water when disconnecting pipes.
Step 2: Install the Sink and Faucet
If you’re installing a new sink, position it in the countertop cutout and secure it using mounting clips or caulk. Before that, install the faucet into the pre-drilled holes. Apply plumber’s putty or silicone around the base to prevent water intrusion.
Tighten the faucet nuts securely using a basin wrench. Attach the flexible water supply lines to the faucet’s hot and cold inlets, but don’t connect them to the shutoff valves yet.
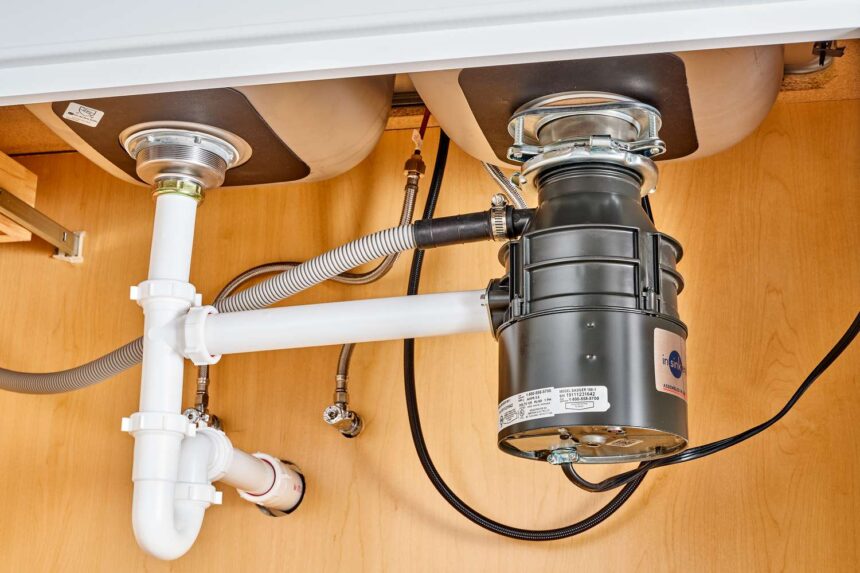
Step 3: Mount the Garbage Disposal
Most garbage disposals are designed to mount under the sink’s drain hole on the side opposite the dishwasher hookup. Here’s how to install it:
- Remove the disposal unit’s mounting ring and install the included sink flange into the drain hole with a bead of plumber’s putty underneath.
- Attach the mounting assembly below the sink and tighten the ring to secure the flange in place.
- If you’re connecting a dishwasher, knock out the dishwasher inlet plug on the side of the disposal unit before installation.
- Align the garbage disposal with the mounting ring and lock it into place by twisting.
Step 4: Connect the Dishwasher Drain
The dishwasher connects to the garbage disposal via a drain hose. Follow these steps:
- Insert one end of the dishwasher hose onto the disposal’s dishwasher inlet (which you opened in the previous step).
- Use a hose clamp to secure the connection tightly.
- Run the other end of the hose to the dishwasher.
- In many areas, you’ll need an air gap installed on the sink deck to prevent backflow into the dishwasher. Check local codes to see if it’s required.
Step 5: Install the Drain Pipes and P-Trap
With the disposal in place, it’s time to assemble the drain system. Most kitchens have a two-bowl sink, so you’ll be joining two drain lines into one.
- Attach a tailpiece from the second sink bowl into a T-fitting or baffle tee.
- From the T-fitting, connect a horizontal pipe into the garbage disposal discharge outlet using a slip nut.
- Connect the discharge pipe from the disposal to the P-trap assembly.
- The P-trap then connects to the wall drain stub-out pipe.
Use compression fittings and washers, and hand-tighten everything first. Make sure all pieces are properly aligned before securing them with a wrench.
Step 6: Connect the Water Supply Lines
Now return to the flexible supply lines you previously attached to the faucet. Connect them to the shutoff valves under the sink. Use Teflon tape on the valve threads to ensure a watertight connection.
Tighten the connections with a wrench, but avoid over-tightening to prevent damage.
Step 7: Test for Leaks
Turn the water supply valves back on and run the faucet. Watch closely for leaks at every connection: the supply lines, drain lines, garbage disposal, and dishwasher hose.
Plug the sink and fill it with water to test the drain system under pressure. Pull the plug to release water and inspect the P-trap and joints for drips.
Also, run the dishwasher through a rinse cycle and check the hose connections and garbage disposal for leaks.
Step 8: Plug in the Garbage Disposal
Plug the disposal unit into the electrical outlet under the sink. If it’s a hardwired unit, you may need to connect it to a wall switch or circuit using proper electrical techniques—this may be best left to a licensed electrician.
Flip the switch to make sure the unit powers on correctly.
Helpful Maintenance Tips
- Run cold water: Always run cold water while using the garbage disposal to solidify any grease and prevent clogs.
- Avoid certain materials: Don’t put fibrous materials (like celery), eggshells, or coffee grounds into the disposal.
- Clean regularly: Use a combination of ice cubes and lemon slices to clean and deodorize the disposal naturally.
- Check connections: Inspect under the sink monthly to make sure there are no slow leaks or signs of corrosion.
When to Call a Pro
Call a licensed plumber if:
- You are installing a disposal unit that requires rewiring.
- The kitchen plumbing layout needs major changes.
- You encounter persistent leaks despite careful installation.
Conclusion
Plumbing a kitchen sink in Carmel with a garbage disposal and dishwasher hookup may seem complex, but it’s completely doable with some preparation and care. Each component has a critical role, and when connected correctly, your kitchen will run efficiently and hygienically for years to come. Whether you’re remodeling or just replacing a fixture, this upgrade can greatly improve your kitchen’s functionality.