In today’s cloud-native world, Kubernetes has emerged as the go-to platform for managing containerized applications. But with great power comes great responsibility, particularly when it comes to user authentication and access management. Enter LDAP (Lightweight Directory Access Protocol), a robust solution that can seamlessly integrate with your Kubernetes environment.
Imagine having a centralized way to manage user permissions across multiple clusters and services. That’s the magic of getting an LDAP profile set up in your Kubernetes architecture. Whether you’re running a small-scale application or scaling up to meet enterprise demands, understanding how to get ldap prpfile kubeenates can make all the difference in maintaining security and efficiency.
So, if you’re ready to elevate your Kubernetes game while ensuring secure access for users, dive into this guide! We’ll explore everything from setting up an LDAP profile to troubleshooting common hiccups along the way. Let’s unlock the full potential of your Kubernetes environment together!
Understanding get ldap prpfile kubeenates
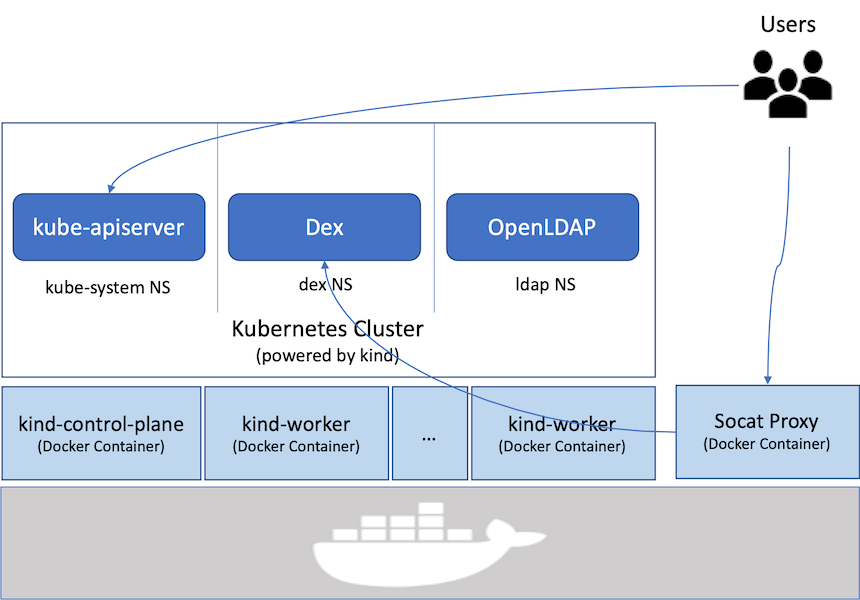
Understanding how to get ldap prpfile kubeenates starts with recognizing the role of LDAP in a containerized world. LDAP serves as a directory service, helping manage user credentials and permissions within Kubernetes clusters effectively.
When you integrate LDAP with Kubernetes, you’re essentially creating a robust authentication mechanism. This setup allows for centralized management of users and groups, streamlining the process across various applications.
Kubernetes can leverage this functionality through its API server using an external authentication provider. By doing so, it ensures that access control policies are consistently enforced across your entire environment.
Getting familiar with these concepts is crucial if you want to implement secure practices while managing user access in your Kubernetes deployments. The next steps involve setting up an LDAP profile tailored specifically for your needs within this ecosystem.
Benefits of using LDAP with Kubernetes
Integrating LDAP with Kubernetes offers a plethora of advantages for organizations seeking streamlined identity management.
First, LDAP provides centralized user authentication and authorization. This means easier scalability as new users can be added without modifying individual application settings.
Enhanced security is another significant benefit. By using an established directory service, organizations can implement strict access controls and audit logs to monitor activities within their clusters.
LDAP also simplifies compliance with various industry regulations. Maintaining a single source of truth for user credentials helps in audits and ensures adherence to standards.
Moreover, the seamless integration between Kubernetes and LDAP allows teams to manage permissions efficiently across multiple projects or namespaces, reducing administrative overhead.
This powerful combination boosts productivity by eliminating repetitive tasks associated with user management while ensuring that only authorized personnel have system access.
Setting up an LDAP profile for Kubernetes
Setting up an LDAP profile for Kubernetes begins with understanding your existing LDAP infrastructure. Assess the schema and attributes that will need to be mapped.
Next, you’ll want to create a configuration file. This YAML file contains essential details like server address, port, and bind credentials. Pay close attention to indentation as it’s crucial in YAML syntax.
After preparing the config file, deploy it into your Kubernetes cluster using kubectl commands. Ensure that necessary permissions are assigned to allow proper access between Kubernetes services and the LDAP server.
Once deployed, test the connection from within Kubernetes pods. Verifying connectivity helps identify any misconfigurations early on.
Monitor logs for any errors during this setup phase. Addressing issues promptly can save time down the line when scaling or modifying your deployment strategy.
Step-by-step guide to configuring LDAP with Kubernetes
To configure LDAP with Kubernetes, start by ensuring you have an LDAP server ready. You’ll need its connection details for the next steps.
Begin by creating a Kubernetes secret to store your LDAP credentials securely. This keeps sensitive information out of sight but accessible when needed.
Next, define your deployment in YAML format. Specify the necessary environment variables like `LDAP_URL`, `BASE_DN`, and any required service account configurations.
Once your deployment file is ready, apply it using `kubectl apply -f .yaml`. Monitor the status of your pods to confirm they’re running smoothly.
Don’t forget to set up role-based access control (RBAC) if you plan on managing user permissions through LDAP. This ensures users can only perform actions they are authorized for within the cluster.
Test connectivity between Kubernetes and your LDAP server using logs or debug commands to ensure everything functions correctly.
Troubleshooting common issues with LDAP on Kubernetes
When working with LDAP on Kubernetes, issues can arise that hinder smooth operation. One common problem is authentication failure. This often stems from incorrect configuration in the LDAP settings or mismatched credentials.
Another frequent issue involves connection errors between Kubernetes and the LDAP server. Ensure that your network policies allow communication on the required ports. Firewall rules should also be checked to prevent blocking essential traffic.
Sometimes, you may encounter performance bottlenecks. Monitor resource usage to ensure that both your pods and the LDAP server have adequate CPU and memory allocations.
Logs are invaluable for diagnosing problems. Always review Kubernetes pod logs alongside those of the LDAP service for clues about what might be going wrong.
In cases where users cannot access specific resources, verify role bindings and permissions within Kubernetes as these can directly impact user access rights based on their LDAP attributes.
Best practices for managing an LDAP profile on Kubernetes
Managing an LDAP profile on Kubernetes requires a thoughtful approach. First, ensure that you regularly update your LDAP schema to align with the evolving needs of your applications.
Implement role-based access control (RBAC) carefully. This helps in restricting permissions for users based on their roles within the organization. It minimizes unnecessary exposure and enhances security.
Automate configuration management using tools like Helm or Kustomize. These tools simplify deployments and upgrades while maintaining consistency across environments.
Regularly monitor LDAP performance metrics as well. Set alerts for anomalies to catch potential issues early on, ensuring system reliability.
Maintain thorough documentation of your configurations and changes made over time. This practice not only aids in troubleshooting but also facilitates knowledge transfer among team members, fostering a collaborative environment around managing LDAP profiles effectively.
Conclusion
Getting an LDAP profile for Kubernetes is a significant step toward enhancing your cluster’s security and user management. By integrating LDAP, you streamline authentication processes and maintain consistent access controls across your applications.
The benefits of using LDAP with Kubernetes are clear—simplified user management, centralized authentication, and improved operational efficiency. Setting up your LDAP profile may seem complex at first, but following the outlined steps can simplify the configuration process considerably.
Remember to always troubleshoot potential issues proactively and adhere to best practices for managing your profiles effectively. This approach ensures that you maximize the advantages offered by combining LDAP with Kubernetes while minimizing any disruptions in service or security vulnerabilities.
With these strategies in place, you’ll foster a more secure and efficient environment for managing users within your Kubernetes infrastructure. Engaging with this technology not only enhances performance but also lays down a solid groundwork for future scalability in cloud-native operations.